How to Copy Files without Changing Date Stamp on Windows 10
Solved: Windows 10 Copy Files Preserve Timestamp
When you copy a file from one location to another on your computer, a new file is created with new timestamp. This is quite annoying if you want to manage photos imported from digital camera or mobile phone by taken date. Cut & paste can avoid this problem, but you might have to recover lost photos if the transfer is accidentally interrupted. Actually, Windows 10 hides a useful feature from us which allow people to copy files and preserve timestamp.
Timestamp Types of a File
When a photo is taken on digital camera or mobile phone, the taken time is stored into its metadata along with other information, like camera name and edit program. The embedded Date taken won’t change subsequently, but may lose due to some reasons. The equivalent date for document is called Content created. When you save the photo or document after editing, the timestamp will also be stored, separately as Date modified and Date last saved.

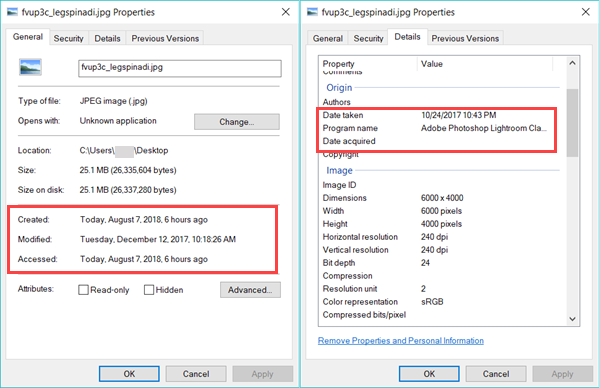
However, the most obvious timestamps that we can easily notice in a Windows 10 computer are provided by the operating system. When we import files that were not created in this computer, the system will see them as new files and assign them new timestamps: Created, Modified and Accessed. The rule also applies to files created by copy and paste. Usually, Windows system displays the new Created time in File Explorer by default. Though we can add Date taken or Date modified to the status bar, the setting only works in one folder each time. If we can copy files without changing date stamp from the very first, then why go through the hassle?
We can check the timestamps of a file on General and Details tabs by right-click and choose Properties. Then, how can we tell Windows to preserve the timestamp on file copy? We can do it with a command line.
Robocopy Command Line
Robocopy (Robust File Copy) is a command-line directory and/or file replication command. It was first introduced in Windows Vista and Windows Server 2008, and kept in Windows 10.
Benefits of copying files using ROBOCOPY command:
- Preserve original timestamp
- Faster than normal File Explorer transfer
- Efficiently copy all files of the same format from all subdirectories to destination while keeping original structure
How to Copy Files without Changing Date Stamp
Robocopy is a command that we use in Command prompt without any third-part software. Please follow steps below.
- Step 1. Press Windows key + R.
- Step 2. Input “CMD” and hit enter to open Command prompt. Click OK when Windows User Control pops up.
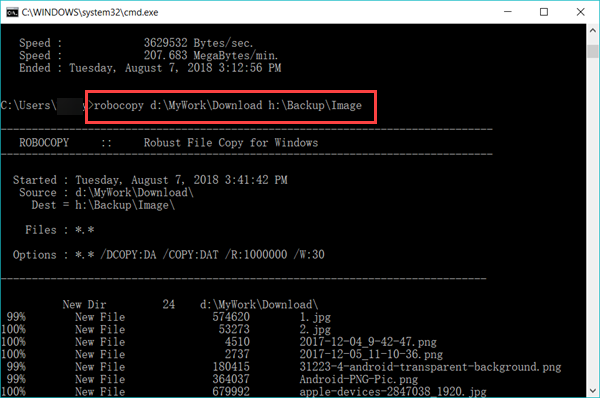
- Step 3. Type Robocopy commands to copy files while preserving timestamp.

Depending on how you want to do the transfer, there are different commands. Keep reading to know which to choose.
Robocopy Command Samples
Robocopy command has a simple structure:
ROBOCOPY source destination [file [file]…] [options]
However, there are a lot of options functioning for various purposes. Here we demonstrate how to copy files with Robocopy for common usage with examples. Please open Command prompt, then try them by typing a command and hitting enter.
1. Copy files in Download folder from D:/MyWork to H:/Backup
Robocopy d:\MyWork\Download h:\Backup
This doesn’t include subdirectories in Download folder. If there is no Backup folder in destination location, the system will create it automatically. Make sure the destination is a new empty folder if you don’t want the copied files to mess up with other existing files.
2. Copy Download folder including subdirectories from D:/MyWork to H:/Backup
Robocopy d:\MyWork\Download h:\Backup /s
By adding /s, the command tells the system that you want to include all subdirectories in D:/MyWork/Download path, but not including empty folders.
3. Copy a picture Dog.jpg from D:/MyWork/Download to H:/Backup
Robocopy d:\MyWork\Download h:\Backup Dog.jpg
If you just want to transfer a single file, just type the complete filename at the end.
4. Copy all jpg files from D:/MyWork/Download to H:/Backup
Robocopy d:\MyWork\Download h:\Backup *.jpg
This command will copy all jpg files in Download folder to destination location. If you want to include jpg files in subdirectories in Download folder, just add /s to the end. Copied jpg files from subfolders will be saved with original structure.
For more options in Robocopy syntax, you can type robocopy /? at Command prompt. However, some commands may wipe certain existing files. If you lost important files accidently, please try Windows file recovery solution as soon as possible.
Now you should know how to copy files on Windows 10 and preserve original date stamp with Robocopy command. This method should also work on previous Windows 7/8. Feel free to tell us whether it works for you or not.
